

Why Purchase from All-Star Telescope?
Free Expert Support
Whether you are a first timer needing help with setting up or an enthusiast that can't quite make that one thing work, our expert staff are ready to support your needs. With decades of knowledge and first hand experience we've been there and we can help you through it!
Stress Free, Secure Transactions
You can trust purchasing and delivery with All-Star Telescope. All of our transactions are 100% secure and Level 1 PCI DSS compliant thanks to Shopify's ShopPay platform. For additional protection, we insure 100% of the value of every shipment we make. If it get's lost during shipment, we replace it. If it gets damaged during shipment, we replace it. We make sure your product arrives exactly as you would expect it to; we promise.
We also ensure privacy protection. We never keep any of your credit card information on file and any of your personal data is stored according to our policies.
30 Day Return Policy
Buy with confidence knowing that we accept returns up to 30 days after purchase. We want you to have something you will actually use and we are confident that we keep good quality products in our store with No Junk.
Price Match Promise
Shipping around for the best price is tough, we make it easier by offering the best pricing in the market. But if you find a better price on an in-store item somewhere else we will match it!
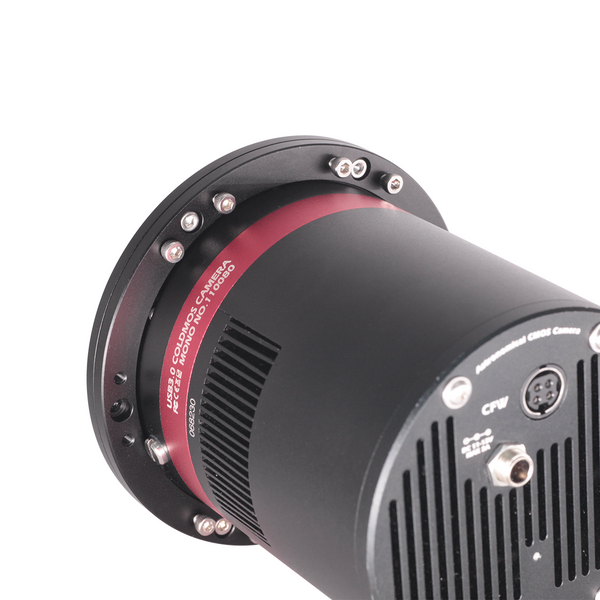
Product Description
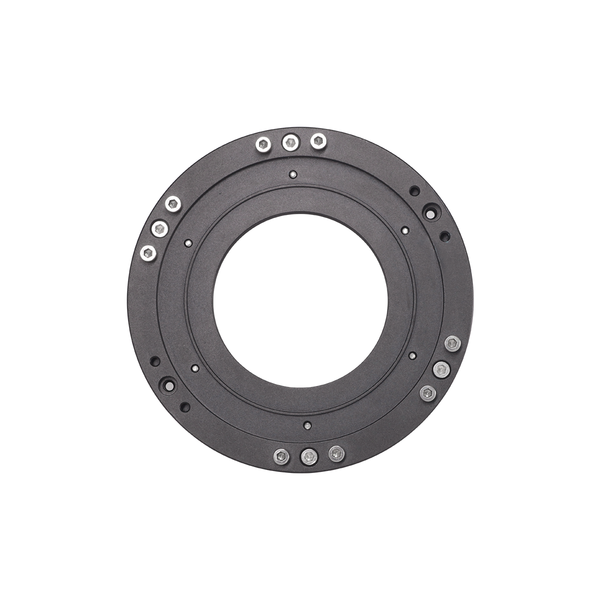
With a rear adjustment design, even after installing a filter wheel, it can be easily adjusted and is suitable for most astronomers using the combo of mono camera+ filter wheel.
We provide six sets of adjustment points. You can choose either a three-point adjustment (equilateral triangle arrangement) or a four-point adjustment (rectangle arrangement).
Compatible Models
- QHY600PH-SBFL
- QHY268M all versions
- QHY268C(short back focal length version after 2022)
PS: The adapter can work with QHY533 in theory, but this camera with a small sensor is used mostly by beginners, it is not recommended to use the adapter with it.
Unchanged Original Back Focal Length
This tilt adjustment adapter is simple to install. Use a screwdriver to remove the original front end of the camera and replace it with the tilt adjustment adapter. Note that removing the default front end also means that the factory focal plane calibration is invalidated and you will need to calibrate the focal plane by yourself.
Again, this tilt adjustment adapter is perfectly compatible with the above models, and after replacing the original front end, the focal length increment will not change, so you can still keep the original adapter configuration, or adjust the adapters according to the standard adapter installation instructions.
Appendix: Tilt Adjustment Introduction
Introduction of Tilt Adjustment
Tilt adjustment is to make the camera sensor square to the whole optical system (optical axis). We hope what follows may help you.
For most amateur-level astrophotographers, Tilt adjustment is very difficult, so it is not recommended for beginners to adjust on their own, including QHY’s newly released tilt adjustment adapter, which is only recommended for astronomers with experience in tuning equipment. Fortunately, all QHYCCD cameras have been calibrated by professional high-precision instruments before leaving the factory.
S0 why the tilt adjustment structure is still retained? This is because not only the focal plane need calibration, the optical axis of the telescope also needs to be accurate. For example, a poorly calibrated optical axis, minor deformations caused by the unstable structure of the scope or by overloaded equipment, the use of adapters of poor quality, can all lead to problems with the entire optical system. We cannot ensure the stability of the whole optical system, so we offer some tilt adjustment methods for our users.
Before tilt adjustment, please make sure that the telescope’s optical axis is adequately calibrated. Besides, we recommend that you choose equipment with a higher optical tolerance. we do not recommend telescopes with vary small focal ratio. Though they can achieve “fast” capture, whether reflector or refractor, the optical axis calibration for focal ratio below f/4 is difficult.
Several Methods of Tilt Adjustment
1. Adjustment with copper foil (applicable to most equipment): After obtaining the distance and direction of the tilt position of the focal plane, copper foil is placed on the relatively lower part. Usually, the thickness of the copper foil is between 65um and 100um, and it can be adjusted with a maximum precision of 20-30um.
2. Adjustment with screws (Applicable to QHY268/QHY533/QHY600PH-SBFL and other products with the new front end): Loosen the 6 cross screws on the top end of the camera, and install a hexagonal socket bolt at the recessed corner of the focal plane measured by the software to elevate this corner. Then tighten the 6 cross screws and verify again with the focal plane analysis software.
3. Adjustment with QHY tilt adjustment adapter (additional purchase required): This adapter can replace the original front end of your camera, whlie the replacement does not affect the focal length. With a rear adjustment design, even after installing the filter wheel, it can be easily adjusted and is suitable for most astronomers.
Additional Articles, Videos, and Links

Astrophotography for Beginners Step 4: Shooting Deep-Sky Images
Taking deep sky pictures can be daunting, luckily there is an easy process to follow to allow you to get great shots! Here is the typical process for actually taking deep-sky images in the field.

Astrophotography for Beginners Step 3: Choosing Gear for Deep-Sky Imaging
Using a star tracker gains you experience with the fundamentals of deep-sky imaging. Shooting the Moon gains you experience focusing and framing through your telescope. Through your sessions you’ll...

Astrophotography for Beginners - Start Here: Getting into Astrophotography Step by Step
Shooting the night sky has never been more popular, nor easier. The choice of equipment has also never been better, or more affordable. However, as per the advice given by Dickinson and Dyer in the...
Astrophotography for Beginners Step 1: Using the Star Adventurer Tracker
By far the most economical and easiest way to capture beautiful images of the Milky Way and large deep-sky objects like the Andromeda Galaxy (shown here) is to use a star tracker. Here are steps an...
Astrophotography for Beginners Step 2: How to Shoot the Moon
Close-ups of the Moon are rewarding, and an easy way to learn to shoot through your telescope. While good results are possible with a phone camera clamped to an eyepiece (as shown below), this tuto...