

Why Purchase from All-Star Telescope?
Free Expert Support
Whether you are a first timer needing help with setting up or an enthusiast that can't quite make that one thing work, our expert staff are ready to support your needs. With decades of knowledge and first hand experience we've been there and we can help you through it!
Stress Free, Secure Transactions
You can trust purchasing and delivery with All-Star Telescope. All of our transactions are 100% secure and Level 1 PCI DSS compliant thanks to Shopify's ShopPay platform. For additional protection, we insure 100% of the value of every shipment we make. If it get's lost during shipment, we replace it. If it gets damaged during shipment, we replace it. We make sure your product arrives exactly as you would expect it to; we promise.
We also ensure privacy protection. We never keep any of your credit card information on file and any of your personal data is stored according to our policies.
30 Day Return Policy
Buy with confidence knowing that we accept returns up to 30 days after purchase. We want you to have something you will actually use and we are confident that we keep good quality products in our store with No Junk.
Price Match Promise
Shipping around for the best price is tough, we make it easier by offering the best pricing in the market. But if you find a better price on an in-store item somewhere else we will match it!
Product Description
Important: For the following imaging camera models, please use a separate 12V power supply rather than the power hub in the ASIAIR Pro as the hub cannot provide enough amperage to power the camera's TEC coolers: ASI6200, ASI2600, ASI2400, ASI533, ASI071MC
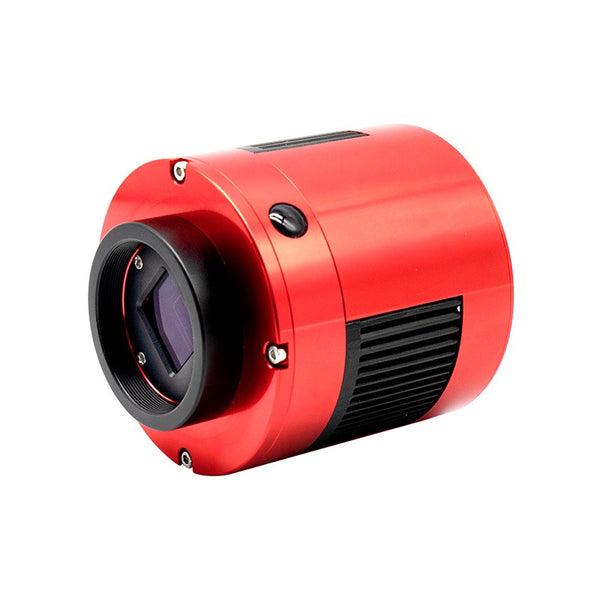
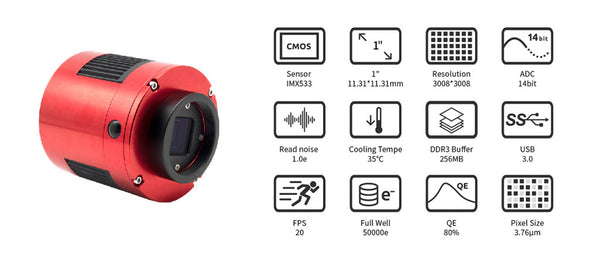
The ASI533MC PRO is equipped with a USB 3.0 interface, and even in 14bit mode, can reach 20 frames per second. The 256MB DDR3 memory ensures stable downloading of frames with increased USB speeds.
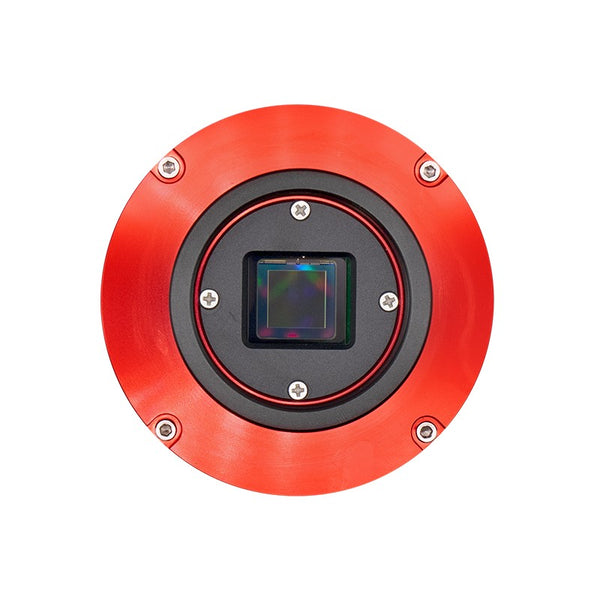
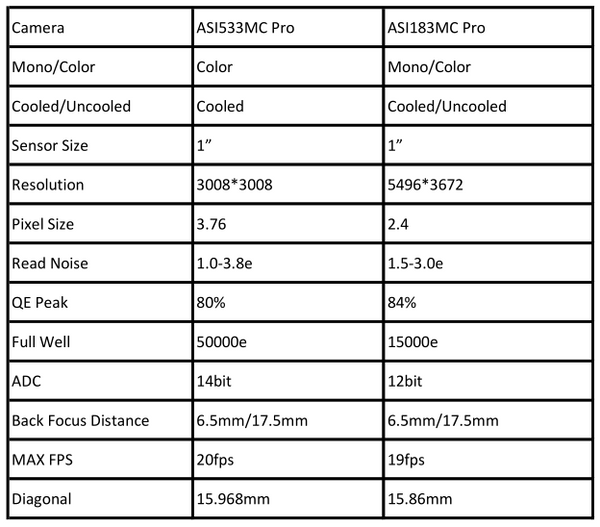
The ASI533MC PRO features SONY’s latest back illuminated IMX533 sensor, with a 1-inch square, 9.07MP sensor that is ideal for astronomical photography needs and can be considered as the latest iteration of the venerable ASI183MC Pro.
IMX533 backlit sensor
Sony’s back-illuminated CMOS image sensor improves sensitivity and noise reduction – the key factors to enhancing image quality, while radically realigning their fundamental pixel structure from front-illumination to back-illumination. It has retained the advantages of CMOS image sensors such as low power consumption and high-speed operation.
With a conventional front-illumination structure, the metal wiring and transistors on the surface of the silicon substrate that form the sensor’s light-sensitive area (photo-diode) impede photon gathering carried out by the on-chip lens. A back-illuminated structure minimizes the degradation of sensitivity to optical angle response, while also increasing the amount of light that enters each pixel due to the lack of obstacles such as metal wiring and transistors that have been moved to the reverse of the silicon substrate.
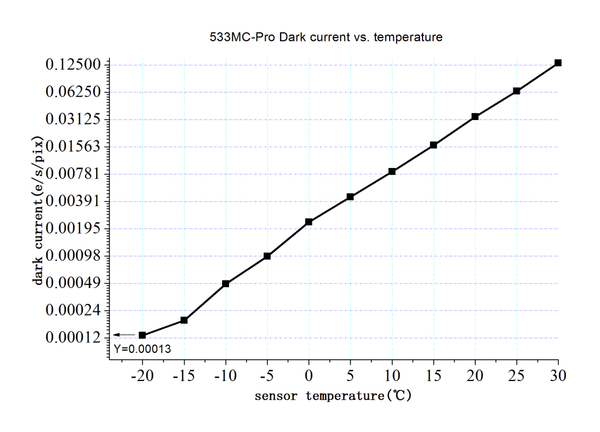
Sony has newly developed a unique photo-diode structure and on-chip lens optimized for back-illuminated structures, that achieves a higher sensitivity and a lower random noise without light by reducing noise, dark current and defect pixels compared to the conventional front-illuminated structure.
Traditional CMOS sensors produce a weak infrared light source during operation quite often seen in the corner of uncalibrated images as the tell tale signs of ‘amp glow’. As the ASI533MC PRO uses zero amp glow circuitry, you won’t have to worry about amp glow even when using high gain, long exposure imaging.
Note: We recommend using an external 12V power supply to power the camera instead of USB 3.0/2.0 only
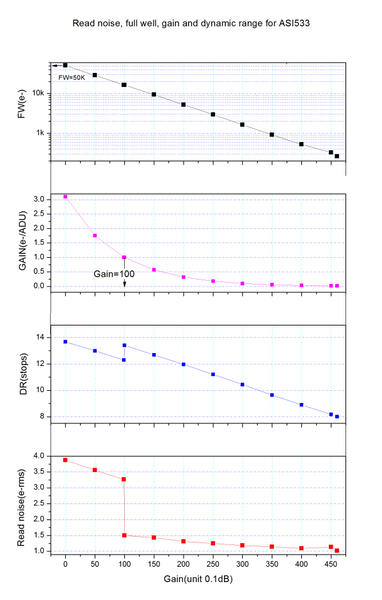
As you would expect this latest generation camera not only retains key features of the ASI183 series such as an attractive QE figure, high frame rate and along with other excellent characteristics of the ASI183 cameras, but also now includes new and improved features such as zero amp glow, extreme low read out noise (as low as 1.0e), 3.76 microns pixel size and an improved 2 stage TEC cooler giving enhanced cooling capabilities.
Specifications
| Sensor | Sony IMX533MC |
| Diagonal | 15.97mm |
| Resolution | 9 Mega Pixel 3008*3008 |
| Pixel Size | 3.76μm |
| Max FPS at full resolution | 20fps |
| Bayer Pattern | RGGB |
| Shutter | Rolling shutter |
| Exposure Range | 32μs-2000s |
| ROI | Supported |
| Read Noise | 1.0-3.8e |
| QE peak | TBD |
| Full well | 50000e |
| ADC | 14bit |
| DDRIII Buffer | 256MB |
| Non-volatile memory/On camera storage | Build-in total 192K byte user-accessible space(image size up to 480X320) |
| Interface | USB3.0/USB2.0 |
| Interface | USB3.0/USB2.0 |
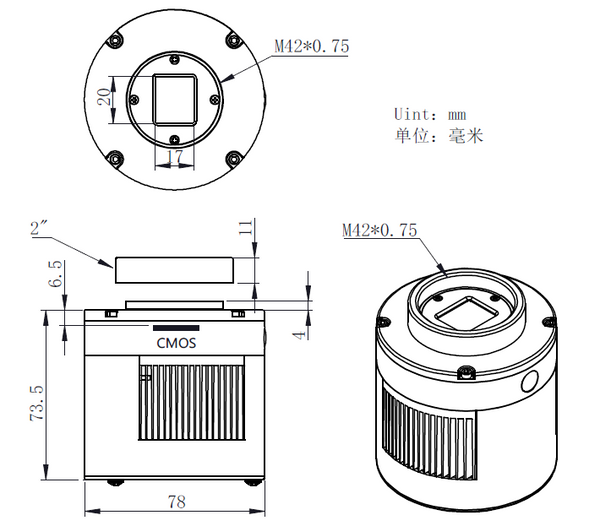
| Adaptor | M42X0.75 |
| Protect window | D32-2-AR |
| Dimensions | 78mm Diameter |
| Weight | 470g |
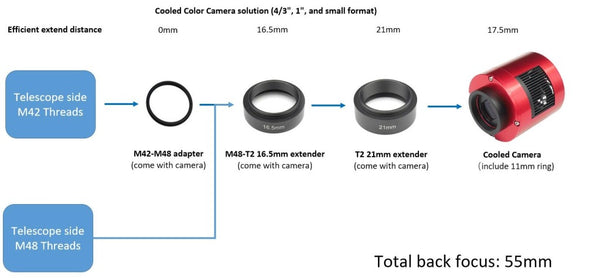
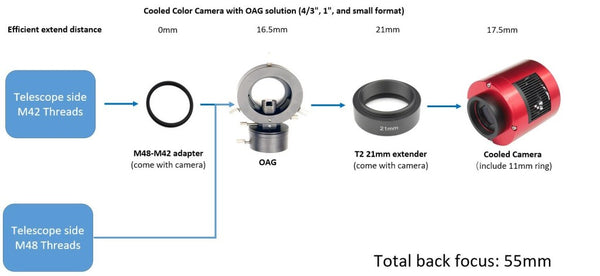
| Back Focus Distance | 17.5mm |
| Cooling | Regulated Two Stage TEC |
| Delta T | 35°C-35°C below ambient |
| Camera Power consumption | 650mA at 5V |
| Cooler Power consumption | 12V at 3A Max |
| Working Temperature | -5°C—45°C |
| Storage Temperature | -20°C—60°C |
| Working Relative Humidity | 20%—80% |
| Storage Relative Humidity | 20%—95% |
Additional Articles, Videos, and Links
External Links
Astrophotography for Beginners Step 4: Shooting Deep-Sky Images
Taking deep sky pictures can be daunting, luckily there is an easy process to follow to allow you to get great shots! Here is the typical process for actually taking deep-sky images in the field.
Astrophotography for Beginners Step 3: Choosing Gear for Deep-Sky Imaging
Using a star tracker gains you experience with the fundamentals of deep-sky imaging. Shooting the Moon gains you experience focusing and framing through your telescope. Through your sessions you’ll...
Astrophotography for Beginners - Start Here: Getting into Astrophotography Step by Step
Shooting the night sky has never been more popular, nor easier. The choice of equipment has also never been better, or more affordable. However, as per the advice given by Dickinson and Dyer in the...
Astrophotography for Beginners Step 1: Using the Star Adventurer Tracker
By far the most economical and easiest way to capture beautiful images of the Milky Way and large deep-sky objects like the Andromeda Galaxy (shown here) is to use a star tracker. Here are steps an...
Astrophotography for Beginners Step 2: How to Shoot the Moon
Close-ups of the Moon are rewarding, and an easy way to learn to shoot through your telescope. While good results are possible with a phone camera clamped to an eyepiece (as shown below), this tuto...


